Hopefully by now you will have investigated the lower profile and decided what action is necessary going forward and have a greater understanding of what is going on below. We talked about particles sizes and pores spaces in the last section and how water and air move through them. This will be explained in a little more detail and show how in the upper profile it is vital for grass/plant roots.
Particle Sizes & Pore Spaces
From a pitch and putt perspective, very few courses have and sand-based greens. Those that do will generally have reputation for firm, fast greens, examples would be Portmarnock, Seapoint, etc. There is no coincidence, that the recommended USGA spec greens are very similar to the sands/soils of St. Andrews in Scotland and other surrounding links golf courses. These sands have just the correct amount of organic matter in them naturally.
This is all to do with the texture and structure of the sand particles. Texture is how the particles feel, which is to do with their shape and size. Structure is how these particles aggregate (bind together) because of their shape and size.
Sand particles are larger and of irregular shape and clay particles are small and round. This is shown to great effect in the illustrations below:
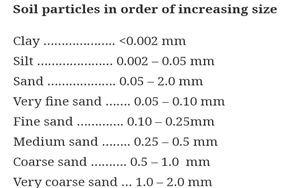
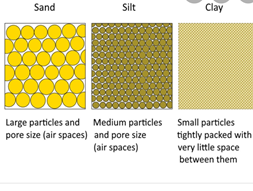
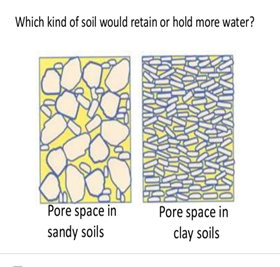
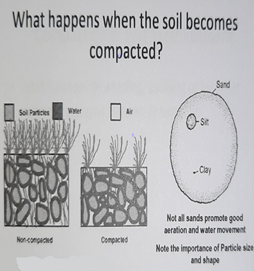
Fig1. Shows just how small clay particles are compared to sand particles in size.
Fig2. Compares the pore spaces of large, medium, and small particle sizes.
Fig3. Illustrates which soil will hole the most water as well as how the large irregular particle sizes of the sand create bigger pores spaces. If you rub sand between your hands you can feel the edges, the roughness compared to rubbing clay which is far softer in your hands.
Fig. 4 Shows everything, how the roots grow better in non-compacted soils and shows the size the size of sand, silt, and clay on the right hand side.
The reason I am explaining this is to show just how important it is even with clay greens which most clubs have, that getting sand into your profile over time is guaranteed to improve drainage and improve the putting surface which is what we all strive for.
Now we will see how grass roots grow through them and how they are being inhibited in doing so. We will now deal with the upper profile.
The Upper Profile Surface – 4”
The Problems:
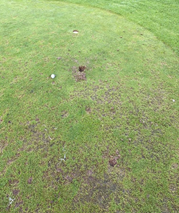
Again, even in the upper profile the problems can include black layer and or compaction. On the surface is where we will see the result of what is going on below. In the upper profile, the implications of compaction can be;
- Restricts growth, lower growth of roots and shoots
- Wear and tear tolerance is reduced
- Opens turfgrass up to other plant stresses and diseases
- Potential for turf recovery, very low
- Will eventually lead to the death of the plant
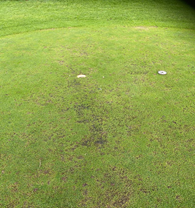
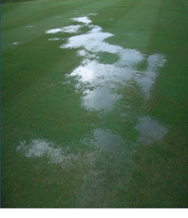
An issue on Pitch and Putt courses can be, “get through the winter months and the greens will dry out for the playing season.” The greens will dry out. But because of compaction, in the summer months or dry spells, it is usually the compacted areas that will dry out first and burn when the weather is hot. When we then irrigate, the water has nowhere to go because there are no pores due to no aeration, there will be surface water, or the water will run off and not infiltrate the soil. Compacted soils are drier in summer and wetter in winter.
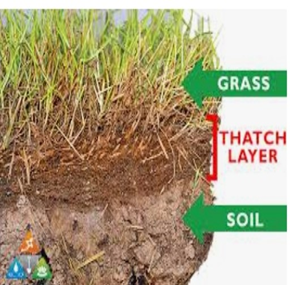
In the upper profile, we have the added problem of thatch and mat. Thatch and compaction generally come hand in hand with one another. As mentioned before, a soil is made up of solids, air, and water. These solids, being clay, sand, loam etc also consist of organic matter (o/m).
Organic matter consists of biological substances such as grass/plant decay, dead tissue such as roots, stems, leaves, stolon’s (all part of plant structure), as well as sugars, micro-organisms, microbial mass, and small fauna (protozoa, nematodes, mites, earthworms, and insects.) The generally rule of thumb is organic matter should make up about 5% of the solids, of which there should be 50% in the profile.

Ref. Alistair Dunsmuir.
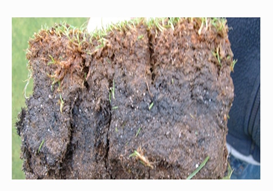
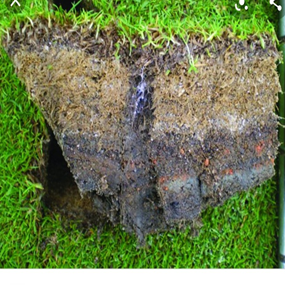
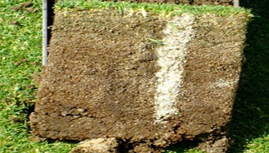
Thatch is the build-up of organic matter over time. It is found just between the green vegetation and the soil surface. It will be dark or black colour and if squeezed will probably be holding water. The signs of thatch would be,
- a yellow/brown colour or appearance
- it smells of decay and stagnation
- poor aeration
- compaction
- quite common in heavy clay soils (which a lot of pitch & putt greens are)
- Annual meadow grass (Poa Annua) will probably be the dominant grass species
This thatch layer, if not reduce or removed can grow to several inches. The living material in thatch is continually breaking down into more thatch, and so the biological cycle goes on until it is removed. Other influences on thatch are clippings from mowing and nitrogen fertilisers. If clippings are not removed or boxed while mowing, they too will land on the turf and will decay, breakdown and back into the soil to add more thatch. Excessive amounts of fertiliser are a huge problem in greens with thatch. As nitrogen drives on succulent root and shoot growth, these too will decay and add more thatch over time.
Lastly, the mat is a tightly intermingled layer of decomposed organic matter and soil. It is found just below the thatch layer and is usually brown in colour. Also found in the mat are microbial biomass and Humic substances, such as Humic acid, fulvic acid and Humin.
Some of these chemicals are useful such as Humic Acid, improves plant growth by helping to retain nutrients and freeing up nutrients and make them available for plant uptake. It also frees up nutrients like iron and phosphates.
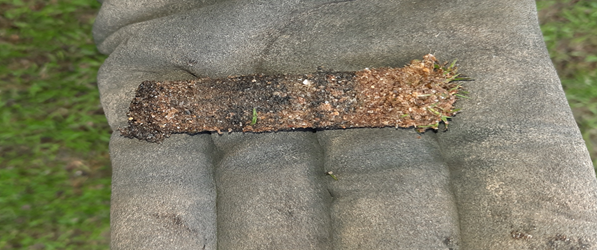
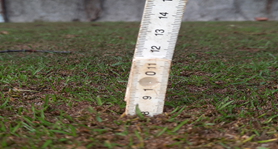
To Summarise: we do need a small amount of organic matter in our soil for the plant/grass to grow strong and healthy, but it must be at manageable levels. I hope having read this you will now be able to identify thatch and see the problems that excessive build-up is causing. Again, I would get the hole cutter or soil sample probe, take a 3”- 4” core, examine it, smell it, squeeze it, and see what level of thatch you have. Research has shown that between 10-12mm is an acceptable level of that assuming regular maintenance is being done.
The Solutions
What will dictate the mount of compaction, thatch and moisture held in the upper profile will be the number of cultural operations we carry out such as aeration, topdressing, and thatch removal. There are also chemical options but once again they must be integrated into cultural and a balanced nutritional management programme for the best results.
In the upper profile we as greenkeepers will have a more hands-on approach and will also see the benefits of the choices we make quicker than with work down in the lower profile. The options we will be covering will be:
- Grooming
- Verti-cutting
- Scarifying
- Hollow tinning/coring
- Solid tinning
- Topdressing
- Slitting
As you see there are several options available, again though, with budgets of pitch and putt clubs we need to know what the realistic options are. Again, feel free to google all the options in more detail for your own purposes.
Grooming
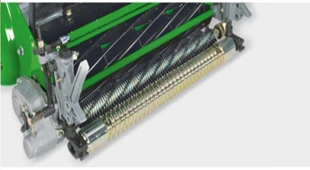
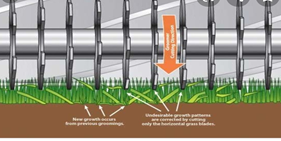
A groomer is an attachment that goes on a greens machine, it sits between the front roller and the cylinder reel. Grooming would be more of a preventative measure then a cure. Its main purpose is to promote growth.
Where it helps with thatch is, it removes the plant material before they die off and become part of the thatch. It does this by trimming the tillers and stolon’s of the plant (grass branches/stems), anything lying laterally will be cut through and stood up for the cylinder reel to mow. It effectively tiddles the grass up to be mowed. It’s area of use would be the few millimeters just above the thatch layer and just below the surface. It is used to produce a finer sward of grass and a truer faster surface.
This can be an expensive acquisition but is an excellent piece of equipment. Great care must be taken in setting the heights or you could cause damage to your green. We will come back to this in an instalment dedicated to machinery and maintenance at a later date.
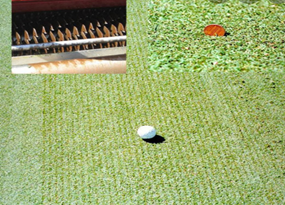
Verti-Cutting
This operation is essentially the same as grooming, the difference being the blades are set lower and therefore cut deeper into the turf and thatch layer. This is where thatch removal begins. Were a groomer is set just below height of cut, verti blades will be set to cut into the soil surface. Verti-cutting blades are spaced further apart and are thicker. Again, great care must be taken when setting this machine also. After this operation, the greens will have to be either mowed or blown to remove the debris left over. This operation could be done as much as 3 times per year and takes the same amount of time as mowing.
Ref. verticutting.blogspot.com
Ref.Pitchcare.ie
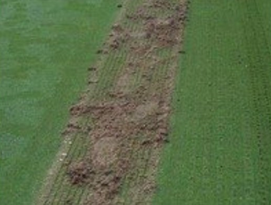
Scarifying
Scarifying is the final of this type of de-thatching operations. Once again, the difference is the depth. This operation is the most aggressive, it basically rakes the turfgrass and is also a good way of removing moss. Scarifying could be carried out as much once or twice per month in the growing season. After all these de-thatching operations it is recommended that topdressing is done to continue to improve pore space and the playability of the surface as well as quicken up recovery. A good scarifier will cost approx. 1,000-1,500 euro.
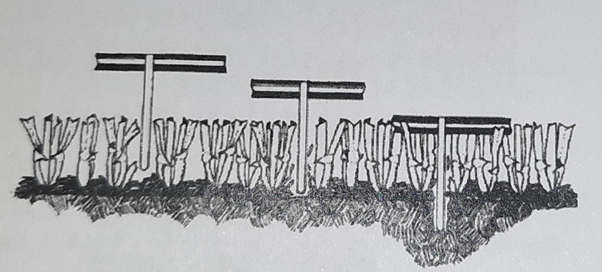
This illustration shows the different depths these three operations go to. Starting with grooming (left), verti-cutting (centre) and scarifying (right). I would highly recommend purchasing a scarifier if possible. It is easy to adjust the depth and you will scarify your greens in the same time it takes to mow them. It is an ideal machine for a pitch and putt course.
You may already have a groomer on your greens mower and verti-cutting heads are usually on a triplex machine which probably means having to hire this machine.
We will turn our attention to the last two cultural operations:
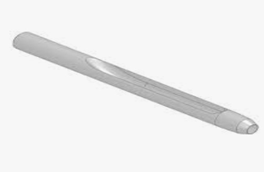
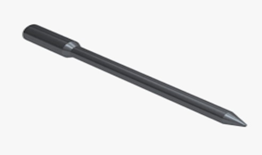
Solid/Pencil Tinning
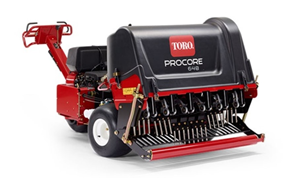
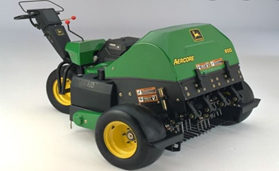
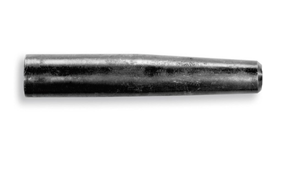
This is a machine that has both a tractor mounted and pedestrian version. The most common types I am aware of is the Toro Procore and the John Deere Aercore. This type of aeration does not remove any turf from the surface, instead it punches holes in the surface. It relieves compaction. The tines sizes can vary from approx. 5mm -20mm and goes to a depth of 4” (100mm). The main benefit to pencil tinning is it can be done with minimal disruption to the surface and be played on immediately after if a small tine, no bigger than 10mm is used.
Another addition is, if you for instance use the small 5mm-8mm tines, you can leave the holes open and let them close over in time themselves, or you can apply a topdressing of sand. If you have an aerator machine this can be done as often as you like. A lot of clubs would do this once a month particularly in the winter months to allow water to drain through the profile. The pedestrian version of this machine is quite easy to use and you would have all greens solid tinned in approx. 2-2.5 hours.
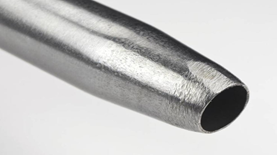
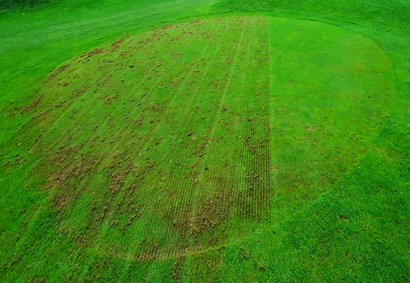
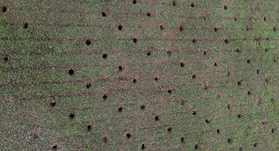
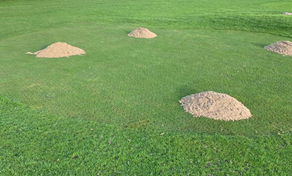
Hollow Coring
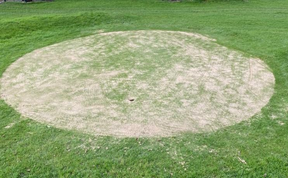
Hollow tinning, hollow coring or poll forking, they all mean the same thing. Removing a percentage of the surface and thatch and to be replaced by clean sand material. It is fair to say this is the one cultural operation both greenkeepers and players dislike the most!!!! The players because it is impossible to putt on after and the greenkeepers because it involves the most work of the year. Having said that it is an essential part of the course maintenance programme, especially in my opinion, for pitch and putt clubs and in particular clubs with clay greens. It also relieves compaction.
Opinions vary as to how many times a year and what months to complete this work. My own recommendation is that for a pitch and putt club, it should be done in February/March to recover from the winter and prepare for the playing season. Then again at the end of late August/September to recover from the playing season and prepare for the wet Autumn and Winter months. I feel as I have said previously, our greens because of their size suffer hugely from compaction. If done in September, it hugely decreases the chance of severe disease outbreaks in October and November as the greens will be considerably drier, as well as having a good putting surface right up to Christmas turkeys.
The machine used for this is the same as for solid tinning, the Toro Procore and John Aercore. The hollow tines are interchangeable with the solid tines. The most common size for hollow coring is approx. 8mm-16mm. There is a chart on the Toro website that will tell you the percentage of the surface removed depending on the tine hole size, depth of tine and spacing size between tines. All off these can be changed to suit your purpose.
It takes approx. 2-2.5 hours to do all greens. It would be advised to have a small crew at hand for the clean-up of cores. Usually, one person would operate the machine, 2 people would snow shovel the cores to the side of the green, another person driving a small tractor with a trailer in which cores would be put in and another person blowing the greens with a backpack blower.
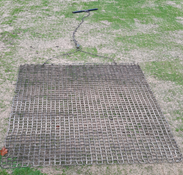
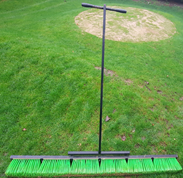
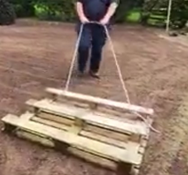
Once the greens are cored, this gives the opportunity for over seeding and a granular feed before topdressing as some greenkeepers do. One thing I must say is I do not believe in leaving the holes open for a long period of time, even weeks in some cases. I have never understood this. I am a firm believer that we hollow core a green to remove thatch and relieve compaction and then topdress to replace what has come out. If the holes are not filled, as the holes close over time, they will cave in on themselves, this will lead to an extremely bumpy surface that will have no new material, for me it will have been a waste of time hollow coring. 2-3 days at most for me, is enough to let the air in and give any water time to drain to the lower profile. There are a few methods to working the sand into the surface. Brushes, a steel chain or even a de-dew swish rod. I find the steel chain the best after hollow coring as it moves the sand into the holes the best. It can bruise the grass, so for this reason I do not use is it for regular topdressing, I would use a brush. (I have also seen a pallet being used for this if you wanted to try it).
Recovery time will be dependent on temperatures and the nutritional stage of the turf. September is great month because temperatures are still quite good at an average of 13 degrees. February will obviously be slower around 8 degrees. March is also a good month with temperatures between 9-12 degrees. Some greenkeepers will apply a feed 7-10 days before hollow coring to speed up recovery. You should see a reaction with conventional release fertilisers in approx. 7 days of application. When topdressing, fill holes completely to the top first time, otherwise you will have to go back out maybe a week later and topdress again, as holes begin to emerge as the sand makes its way into the holes as it dries out and is watered in by rain.
Topdressing
The main reasons for topdressing are:
- To dilute thatch
- To increase structure by helping with infiltration rates
- Helps with aeration capacity
- Helps with nutrient retention and fertility levels within the soil
- It is a great medium for growing grass roots
- It firms and smooths the playing surface
- Promotes greens in Winter
- Promotes recovery from injury and disease
Two sayings stand out for me when it comes to topdressing, “Little and often” and “Building a surface up”. This sums it up for me, imagine the surface you could build by applying a little dusting of sand every 2-3 weeks over the course of the 7-8 month playing season.
No doubt it, topdressing is another pet hate for greenkeepers but an absolute must to achieve a fast, firm playing surface. The two types of sand we will deal with are washed topdressing sand and rootzone mix sand.
Washed topdressing sand
The “washed” refers to the removal of unwanted particles such as clay and silt, it is a purer sand. It is used for regular topdressing as well as for hollow coring. The many benefits are stated above.
Rootzone mix sand
This is sand that comes with different percentages of clay, silt, peat, and sand depending on its intended use. For instance, if you were relaying a new green, you could use a rootzone mix of maybe 70% /30% or 80%/20% sand and soil mixture. The reason for this is to have some organic matter/material in the rootzone to allow roots to develop. Usually then once the root system is developed you would then switch to washed topdressing sand for cultural operation purposes.
My method for top dressing is to mow the greens every 2nd Monday morning and then topdress straight after. The thinking behind this is, so that the sand would be worked into the greens by the following weekends competition, as well as leave it a few days before cutting the greens again as to save the reel and bottom blade from blunting on the machine because of mowing with sand still on the surface. When using sand, it is advisable to keep it as dry as possible, maybe keep it covered with a tarp when in storage.
When topdressing a hollow cored green, for good equal coverage I would put a half wheelbarrow of sand at the corner of each green. This will ensure the edges and the centre of the green will receive an equal application of sand. Make sure to fill the holes to the top. Any excess sand after matting and brushing can be blown off with a back-pack blower. When the sand is spread over the green, it can be a good idea to leave it for an hour or so, to allow to dry out before matting or brushing. This just makes it easier to the work the sand into the surface. Put a rag or cloth in the hole to prevent the sand from blocking the hole for the flagpole to sit in the bottom of the cup.
I hope this has given you a broad view of how important aeration and topdressing is to achieve quality greens. All the topics above can be found in greater detail on the internet. It is essentially a science, but with a lot of common sense. As you work on your course you will find ways and tricks to do it your own way. Obviously not all clubs have the same finances available to either purchase machines or hire them which is why I strongly recommend that clubs come together, pool their finances either to purchase a machine between 2 or 3 clubs in close proximity or maybe for instance, hire a company to hollow core 3 courses in a day.
Even when ordering sand, it can cost approx. 32euro per tonne or 800euro for 21 tonne including Vat for topdressing sand in one truck load. There are clubs paying as much as 70euro per tonne that is bagged. My suggestion would be for clubs to share a load between them. Instead of paying approx. 350euro for 5 tonnes bagged, you would get 10tonnes for approx. 400euro. The DCB has these contacts so I suggest benefiting from them.