Following on from our introduction, we will move on now to preparing our course for a new season. Having checked the condition of your course after the harsh weather of Autumn and the Winter we are currently in, the course and in particular the greens will probably have become wet and compacted. The lack of aeration and topdressing through these months can also cause outbreaks of disease and moss can start to develop. This time of the year is a great time to roughen up the turf as it will have time to recover before the playing season begins. We will now look at how we can start to remedy this and work towards helping our courses dry out quicker. The greens are the most important part of any course and we will start the focus here.
Some important practices and techniques that need to be done and understood for the care of the greens.
This is vital and must be done every day when there is no frost. Diseases, in particular Fusarium, breath more rapidly when the plant or leaf is wet or moist for long periods.
De-dewing, swishing and brushing dew off the greens
It is vital the leaf is kept as dry as possible for as long as possible we achieve this by de-dewing. There are days this time of year if de-dewing is not done the dew will remain on a green all day.
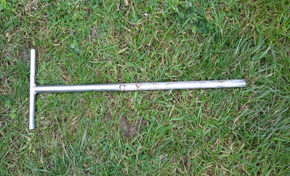
Checking the soil profile of your greens
It is important to remember the ideal profile for a green will be made up of approx. 50% solids (clay or sand rootzone), 25% air and 25% water.
Using a soil sampling probe or even a hole changer will give us a look at the condition down to a depth of approx. 10”. What we find at a depth of 10” will affect the surface we play on above. For our purposes we will call from the playing surface to 4” the upper profile and from 5”-10” the lower profile. A moisture meter is a great tool that are used on some golf courses to measure moisture content in the rootzone. It’s read out gives you the percentage of moisture in the soil, unfortunately they can be quite expensive but would be worth having a look for a second hand one on the internet. The reason why soil sample probes are an excellent tool, is because we can visually see exactly what is going on through the profile. I would highly recommend investing in one.
Maintenance Plan
With the soil profile we will learn the type of material the green consists of, whether it be clay, sand, loam etc, how wet or moist the profile is throughout and what the root depth and growth system is like. It will show any problems that may be developing. Next, we will breakdown the lower profile of the soil sample, 5”-10” depth, samples of some problems we will encounter and some solutions for them.
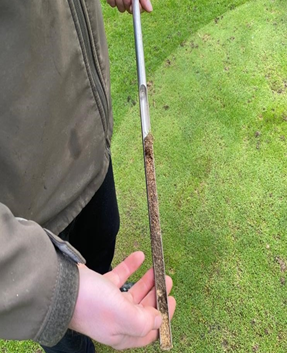
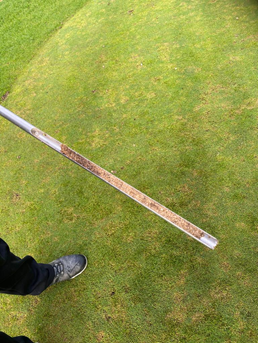
You can see the difference in moisture content between these sand-based greens.
(A) being from a very wet green and heavily compacted right through.
(B) moisture in the top half and little or no compaction in the lower profile.
(C) small amount of moisture at the top but for the most part very little compaction.
Also, with these samples we can see the how the water it struggling to get through the top 2”-4”. Our aim as greenkeepers is to try break that compaction and thatch up, but as you can see in sample (A) if the lower profile is not clean it can be almost impossible as it has no were to go.
We will deal with thatch and top 2”-4” later in the month.
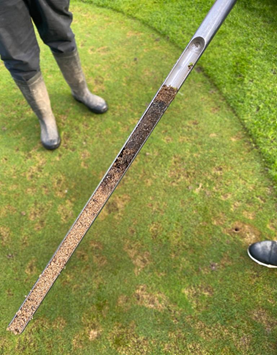
The Lower Profile 5”-10”
The Problems:
This time of year, we may find our lower profile will be damp, dark in colour maybe even black and it will probably be compacted. One of the main things to be aware off, is how it smells.
If this is the case, Black Layer may be present. This is not a disease; it is a disorder. Over time the build-up of stagnant water and other chemicals in the soil will stop oxygen from reaching the lower levels of the rootzone. It will also stop water percolating through the soil. As a result, the soil will essentially be rotten and nothing will grow. The grass on top may appear yellow or brown and the roots will not grow through it. This also promotes algae and moss.
The science behind it the layer is composed of metal sulphides which accumulate because of anaerobic respiration (due to lack of oxygen) by sulphur-reducing bacteria. Iron Sulphide (FeS) is the most important constituent of this black layer. This is formed from the reaction of Hydrogen Sulphide and iron (H2S AND Fe). Hydrogen Sulphide (H2S) is the gas we smell in our greens and smells like rotten eggs. This gas will be produced in large amounts in anaerobic conditions (no oxygen). As water and moisture from rain and irrigation will be held at this level in the profile, then as more rain and irrigation are added the water level will rise and rise until we get surface water with puddles on the playing surface.
Compaction. This problem can come with black layer or can be a problem on its own. We must understandhow water and air move through a soil to understand compaction. At first water will infiltrate (enter the soil) at the surface. It then percolates (moves through the soil). How it does this is through pore spaces between the particles that make up either the clay or sand rootzone of the turf. The larger pores are called macropores and smaller pores called micropores. These are the pores that plant roots grow down through and that air and water move though. The longer the root system the stronger the plant.
Turf will naturally have a certain amount of water and air moving through these pores, then through people walking/playing, machines being rolled over and rain and irrigation added into the mix these pores become smaller and smaller until a point where there are no more. The micropores will fill with water first and then the macropores. Once this has happens there is no oxygen in the soil, like us humans the turf will not last too long without oxygen.
The reason sand is used in greens it to do with how it aggregates (comes together). The best way to explain is if you pick up a handful of sand and make a fist. Squeeze it tightly, then open your hand, the sand will break away and separate. Now take a handful of clay, make a fist, then open your hand, the clay will be more gluey or sticky. You will have squeezed all the air out of the pores within the clay and it will aggregate together but with the sand, it kept its structure and the pores remained, hence why it just fell away in your hand.
What must be remembered is how small pitch and putt greens are. The average golf green is 600m2, our pitch and putt greens total are 1,000-1,500ms. Just think of the number of rounds per year on such a small area. The National Strokeplay alone would have approx. 345 rounds in two days on small greens, not many pore spaces left after that. It is difficult to maintain these pores spaces within a clay soil which is how the compaction comes about and why sand is the preferred medium. Our job is to maintain as many of these pores as possible to allow our greens to breath. I do not expect clubs to be going out in diggers and dumpers to build sand-based greens, but clubs need to understand how important that aeration and topdressing is to have quality greens. There are plenty of golf and pitch and pitch clubs who have quality clay greens, but this is through hard work and dedication.
With black layer and compaction conditions we simply cannot grow healthy grass/turf and have firm fast putting surfaces.
Remember we are supposed to have approx. 25% water and 25% air to enable us to grow strong and healthy grass. Next time you are working on your greens, take a soil sample and see how wet it is and see how close you are to 25%.
The Solutions:
Thankfully, there are several solutions available. While there are bio-stimulant and microbial inoculant products available, these will only work in conjunction with a cultural programme. Ask your chemical supplier for more information on these products. What I would say is there is no quick fix, the following solutions must be incorporated in a programme of aeration, topdressing and a proper nutritional programme and be done consistently to achieve the best results. Here are a few:
*Verti-draining
* Air2G2
*SISIS Aer-aid (injects air)
*Groundquake sand injector
*spiker and slitting applications are available.
Some of these can be expensive so for the purposes of pitch and putt clubs we will look at the two more accessible and affordable options. Feel free to google the list above for your own research.
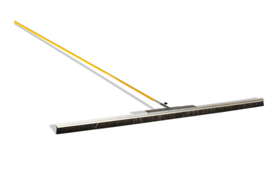
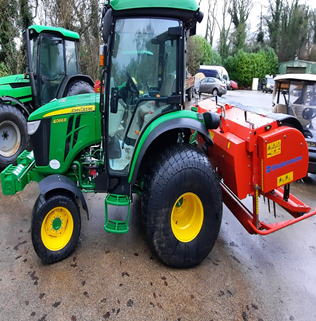
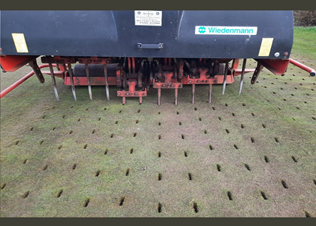
Verti-draining
This involves a tractor mounted machine that injects long tines (8”-12”) into the soil and creates a heaving action. This breaks up the soil below and allows air and water to percolate or move freely through profile. Verti-draining disrupts the surface and tine holes will be left. No cores are removed. With this application it gives an opportunity to topdress and allow sand to reach the full depth of the profile.
If for instance, you did not want to begin a programme of green renovation by completely digging up an old green and relaying it with new rootzone material, verti-draining and topdressing immediately is a great way to start to change the make-up of you rootzone, obviously this would have to be done maybe twice a year over serveral years. This operation must be carried out during a dry period of weather for optimum results.
Air2G2
This is a newer form of aeration. It is basically an air compressor on wheels, with 3 probes that enters the soil and goes to a depth of approx. 4”-6” and blasts air through the profile, it then continues down to a depth of approx. 10” and blasts air through again, breaking through black layer, compaction and damp soil to allow it to breath and allow air and water to move freely. The main benefit to the Air2G2 is that it has no impact on the surface and can be played on straight after.
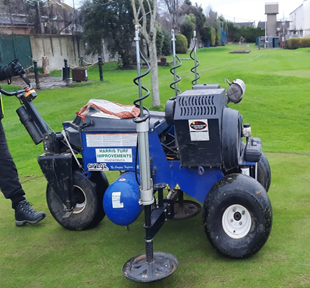
I understand depending on your grounds budget, some things may not be feasible. What I would suggest is whether hiring a company or hiring the machine, share the cost with neighbouring clubs. It should take not more than 2/2.5 hours to do one pitch and putt course. A number of clubs could be done in two days if they are in close enough proximity, I’m sure an agreement could be made. If hiring the machine for self-use, these machines are quite handy to operate once shown proper procedure. You can then use time and time again, adjusting depths or pressure settings as you see fit.
The following videos show how these operations work. The DCB have contacts for clubs to avail of these options and prices. This completes this instalment of the programme. The next time we will concentrate on the upper profile which will include thatch control and other cultural operation such as hollow coring, verti-cutting and scarifying.
Video 1 – Air2G2
Video 2 – Air2G2
Slow Motion Verti-Drain Video