Having covered a lot of the technical information over the first four parts, and hopefully all the winter/spring renovations having taking place, we will now turn our attention to putting the final touches to getting the course ready for the new season. In this part we will give some general information on all the areas of the pitch and putt course, suggested machinery for each area as well as a few tips you may or may not know. We will speak about getting the course aesthetically pleasing as well as maintaining the machines.
Areas to be covered:
- Greens
- Collars (aprons)
- Fairways/Rough
- Bunkers
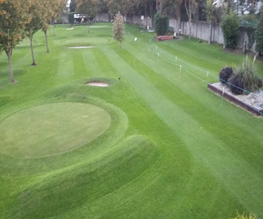
Greens
The height of cut (HOC) seems to be a bone of contention within our game. Simply put, the health and condition of the turf as well as your maintenance plan will determine how low you can actually go. For example, we hear of the odd club going to 3mm, just to clarify I am speaking purely from a pitch and putt perspective, with the shape and size of our greens along with the volume of play I do not feel it possible to produce 3mm HOC greens and keep them at an acceptable standard all year round without having major disease or moss problems throughout the year. I also feel that the contours of a lot of our courses make it impossible to get down to these heights consistently.
Personally speaking, 4mm would be the lowest I would go to and 5mm would be the highest in the playing season. If you stay in this range and do all the cultural and maintenance work, we have spoken about in the previous parts your greens will be healthy, firm and fast all year round. If you stress the greens with going to low, you will do damage over a period of time.
For the time I was involved in Old County, we set the HOC to 5mm, people who have played the course would know there was an excellent speed in the greens. I never went below 5mm, we just topdressed regularly. The other tool we used, and I would recommend every club get one is a brush on the front of the machine. This brush will do the job a groomer does, it stands the grass up just before the cylinder mows the grass, effectively thinning the grass. This will speed up the green without lowering the height of cut and will also stripe up the turf. We used this sometimes with the groomer on as well. I do personally feel if the mechanical groomer is used to much it can lead to moss coming in to a green. I feel the brush does the same job but not as aggressively as the groomer. This is the best way to speed up a green without lowering the HOC.


Other key points for greens are:
*Mowing direction-
Mowing in a different direction every time is especially important to stop the grass lying down and creating a grain. The brush is also excellent for preventing grain. On golf courses the clock is used, 12-6, 10-4 and 8-2, alternate between these three.
*Mowing frequency-
Mowing 3-4 times per week is adequate. Timing is also important, if for example greens are mowed early in the morning, they will be considerably slower for evening play at 6pm. Also, there is the one-third rule, which means do not cut of more than one-third of the leaf ay any one time, this will result in the leave turning yellow.
*Clean-up lap-
There is no need to mow the clean-up lap every time you mow. The contours of pitch and putt greens means the edges of the greens get severely damaged. This is because a large percentage of them are what is called push-up greens or upturned saucer greens. The machines we use to mow are not designed the be used on these types of shapes. That why a lot of clubs get moss or badly worn lines around the edge of their greens. I would go as far as to say maybe reshape some greens if this is a problem by bringing your green in by a machine width or build up the side of your green the make it flatter.
Changing holes-
This all comes down to the individual course, a good rule of thumb I would use is to change 6 holes every week, this means every hole gets 3 weeks, this will also change the course for competitions every week and mixes it up a little. One issue I do see is clubs not changing holes often enough. Either a hole caved in or a badly worn area. Just be aware there is a rule in the rule book about what the hole size should be. A good way to keep the hole shape is to make sure the cup is between 20-25mm below the surface. Any lower and the hole will cave in, if too high a bounce out may occur, use some curved scissors to trim the edge every time you mow.
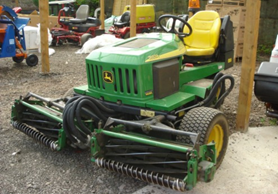
Machine maintenance-
Just a few things to cover here, most importantly is to check the quality of the cut before you use the machine. These machines are set so precisely, it does not take much to knock the cut off. Check this using paper, check the cut on across the blade, left, centre and right-hand side. If it is not cutting paper it will not cut grass. Also, double check height of cut every time before you mow. (If this is an issue feel free to contact the DCB for help and we can perform a demonstration).
We are looking for immaculately presented greens so you should keep your machine, accordingly, be honest, how often do use grease your machine or wash it down?. If you are not looking after your machines you cannot expect a good finish to your mowed green. Wash after every use, and grease rollers and reels every 2 weeks.
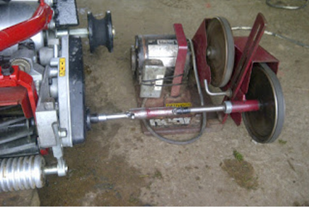
Obviously over time the reels and bottom blade will wear, blunt and the quality of cut will deteriorate. Sending the machine for a service and sharpening is an option, but another option some people might not be aware of is back-lapping. This is a procedure that can be done a couple of times before a proper sharpening will have to be done. The reel is attached to a machine that runs the reel backwards, as this happens it sharpens itself of the bottom blade with the aid of back lapping paste. The benefit of this is that it can be done on site instead of the machine being taken away to be sharpened on a bench grinder.
How to back lap a cylinder mower
I would advise clubs to purchase a second greens machine if possible. It is always good to have a back and is also useful for when your topdress your greens to use the spare machine until the sand has been worked in and then go back to the number one machine, this will save the wear and tear of the blades on your primary machine.
Collars/Aprons
I would recommend the clubs have collars. I feel both from a playing and aesthetic perspective they are very important. Height of cut for the collars would be between 10-15mm. The biggest problem I see generally see with collars is weeds. Weeds of course can be sprayed for which we will cover in a later part, but they can be cut out using knife. The reason the weeds come about is because the turf is stressed, scalped, or probably not being fertilised enough.
Collars should be treated the same as greens, aerate, topdress, scarify and fertilise when doing the greens. This over time will give you the same surface and healthy turf as the greens.
Some clubs will have a dedicated collar machine, if not a quick height adjustment of your greens machine will allow you to use this. Again, always check the cut and height before use, otherwise you might just run a greens set machine on your collar and scalp!!!
If possible, mow collars 2-3 times per week, again remember the one-third rule, do not let them grow to long before cutting. Changing mow direction is also important for the collars to prevent graining, clockwise one day, anti-clockwise the next should solve this problem.
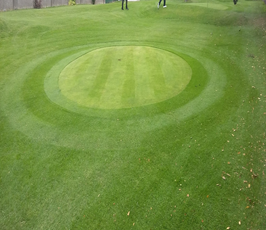
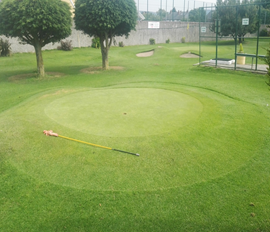
Lastly on collars, if you want to try something different, instead of doing one lap around a green you can try 2 or 3 laps for aesthetic purposes. This can look great if your green is built up or their mounds or hills surrounding the green. Here are a few examples.

Fairways/Rough
Generally speaking, most clubs will have either a ride-on with cylinder units, a ride-on with a rotary deck or gang mowers that are tractor pulled. More often, which machine will come down to cost. No matter which machine you have, once it is maintained well and the blades are kept sharp you should not have many problems and you should have a good finish.
A good height of cut for fairways in pitch and putt would be between 25-50mm. I find 30mm is an ideal height. In the growing season I would recommend, if possible, mowing twice a week, on a Monday to tidy the place up after a weekend play and then either a Thursday or Friday for a weekend play. Because you mow the fairways less than greens and collars, timing is particularly important, for example be aware of how quickly the grass grows, if you have a big competition on a Sunday, will the grass have grown to much if you cut on Thursday, maybe even cutting on the Saturday maybe a better choice. This is something you will have to judge.
The other decision to be made is whether you want to have the course plain or striped up. This is a personal choice, the terrain of the course along with trees and shrubbery layout may determine what you can do. From experience I do find that stripping a course is quicker than just plain. I feel the reason for this is when you stripe the course, and do a few lines you to finish for instance, a particular hole, you will not waste time going over that again, it is done, finished. But when you just go around mowing the course plain people tend to go over certain areas over and over, I have seen this many times and people would not realise it themselves. Personally, if you have time and a good machine, I recommend stripes.
Again, it is especially important to keep machines in good order with regular greasing and check the quality of cut. With the weight of the units on the ride-on machines if a roller seizes up it could mark up your course badly.


Bunkers
For some people, a well-maintained bunker can be hard to play out of, but a poorly maintained bunker can be impossible at times. Since I have become a greenkeeper, it has become a pet hate of mine how badly maintained some bunkers are around the country.
What frustrates me is, how little time is involved in keeping them in good shape, when how small in size and how few there is on courses. I would say on average there is between 5 and 10 per course. Another problem that everyone will be aware of is how clubs are either filling them in or flattening them down to make them easier to play. With doing this, holes are being ruined both by playability and aesthetically speaking, having said that it is up to each club to do what they feel is best for their members, but I must say a bunker is supposed to be a hazard.
Onto the maintaining now, I would recommend clubs use topdressing sand for bunker sand. The reasons for this are bunker sand can be expensive, you will already have topdressing sand in stock for the greens and finally, as players hit sand onto the green from the bunkers it will act as a topdressing. Certain bunker sands have silica in them which can burn greens in certain circumstances.
I recommend trimming the bunker edge every 2 weeks in the growing season. There a few methods for doing this along with machines. Some people will use a shears or other tools but for me using a strimmer upside down as shown in the video is the quickest, and most clubs will have a strimmer for strimming around tee-boxes and trees etc.
The method I use for this is to with the back of a big rake push or shovel the sand back off the edge to the middle of the bunker. Then strim the edge and finally using a blower, blow the grass clipping out of the bunker, then rake the sand around evenly and leave the height of lip or edge you desire.
When raking just to tidy up the bunker there is no need to disturb all the sand in the bunker with a rake with long teeth. Raking just the top 25”/inch is enough for playability. I have a rake that the teeth are cut down to 25mm for this.

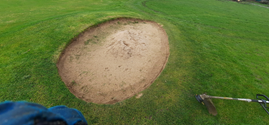
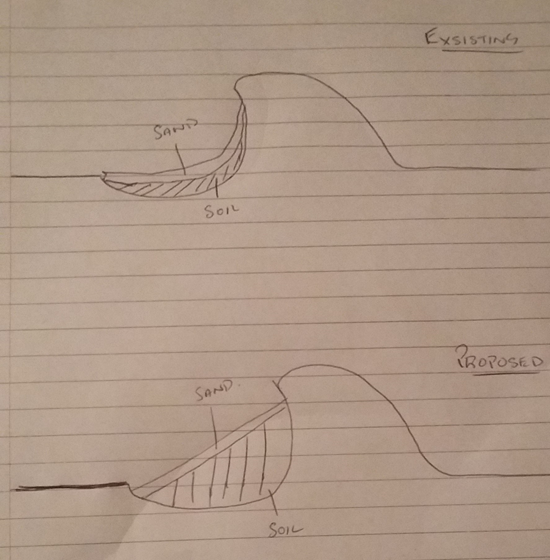
Lastly, on bunkers, if you are having problems with the shape of your bunker in particular a high lip, before you put a flat bunker in with a mound in front, consider your options. Firstly, this probably has happened because the way players rake the bunker after they play. They usually stand at the front of the bunker and rake the sand towards them. Over time all the sand from the back of the green will be in the front and you will have a big lip. What I suggest for this is to empty all the sand out of the bunker. Get some topsoil, start from the top of the bunker, and fill in where you feel is low, go from top to bottom allowing for about 2-3 inches of sand to be put back in evenly. By doing this you will keep the original outside shape but with an even lip the whole way around and it will look better than a flat bunker.